
Tuesday, 24 November, 2020
A Gentle Introduction to Windows PowerShell
A getting started guide. How to install, run and use PowerShell for beginners
During this post, I’ll briefly cover what PowerShell is, how you install it and run commands. I’m not going to go over the huge variety of commands available and how to use them, but I will introduce some of the more basic commands and explain how to put them in a script file so you can save and automate common tasks, how to debug your PowerShell scripts, and where to find help going forward with PowerShell and writing more advanced scripts.
What's PowerShell
PowerShell is a command line tool for task automation and system configuration management. Microsoft started development way back in 2002 and shipped PowerShell v2 as part of Windows 7. In Windows 10 it’s become the default command line prompt, demoting MS DOS to the margins. The other key feature of PowerShell is that it’s based on the .NET framework. This means you can extend it by writing programs for it using .NET languages like C# .
Installing PowerShell
If you’re running Windows 7+ you don’t have to. PowerShell v2+ comes with Windows 7 and above.
NOTE: If you’re using an older Windows OS then you’ll need to download and install it, but to be honest you’re going to find it difficult to find the installers and you’ll probably be limited to PowerShell v1.
For non-Windows OS users, there is an open source project on GitHub which may be of interest: https://github.com/PowerShell/PowerShell . However, please be aware this Post is Windows specific and will only be of limited help for you.
Running PowerShell
Simple.
Type PowerShell in to the Windows command bar and select PowerShell.
You can test it by entering your first command:
Get-ChildItem
which is the equivalent of the MS Dos dir command and will show a directory listing.
NOTE: PowerShell can also be accessed by right clicking the Windows start icon, or by pressing the Windows key and X together, and selecting PowerShell from the menu. You may wish to run PowerShell as Admin (a different option on the menu) from time to time to run commands which require full administration privileges on the system.
Why are there so many PowerShell Commands?
There are a hell of a lot of commands in PowerShell. So many it can be confusing and over whelming.
Let’s go back to the Get-ChildItem command a moment. I said it’s essentially a simple file directory command, right? In fact, you can type dir or ls in to PowerShell and you will see the same results.
Why have so many commands for the same thing? It’s not to confuse you, honest, it’s because Microsoft wanted to make PowerShell more accessible to people coming from MSDOS or Unix Bash based systems.
It’s all done using Aliases. Aliases are a way of saying make this command phrase have this action. You can add, edit and delete aliases on your system to configure however you like. To list all the aliases on your system type: Get-Alias.
To find out what Aliases have been set-up for a particular command, in out case Get-ChildItem type:
Get-Alias -Definition Get-ChildItem
and you'll see:
CommandType     Name                                               Version    Source
Alias           dir -> Get-ChildItem
Alias           gci -> Get-ChildItem
Alias           ls -> Get-ChildItem
Proving Get-ChildItem, dir and ls are all the same command; and even telling us there’s yet another shorthand variant called gci.
So, firstly, there aren’t as many commands as you think, just variants.
Secondly, PowerShell’s commands and capabilities can be extended through the use of Modules and Snap-ins. You can browse, download and install extensions from the PowerShell Gallery.
Side note: for example, there's a PowerShell extension for Windows Azure for managing Azure's components.
Understanding PowerShell Commands
If you want help understanding a PowerShell command you can use the Get-Help command. For example, to find out more about the Get-ChildItem command we’ve already discussed, use:
Get-Help Get-ChildItem
NOTE: This may fail the first time you try. If so, access PowerShell as an Administrator. Do this by typing PowerShell in to the Run Box, right click, select Run as Administrator (there are lots of ways to do this!). Type Update-Help. This will download the help files for you. You many need to close down all open PowerShell windows and open a new one before this will work.
The Get-Help command accepts options to limit the display, try these variants:
Get-Help Set-Location -Full
Get-Help Set-Location -Examples
Get-Help Get-Location -Detailed
Finding PowerShell Commands
If you don’t know how to do something and want to find out how, then Get-Command can help.
NOTE: I’m aware Search Engines exist! But sometimes this way is quicker. Honest.
Most PowerShell commands are verb-noun formatted. Get-Location and Set-Location for example. If you know you want to Get something you can type: Get-Command -verb get ; and if you know the start of the command you can type:
Get-Command Set-Loc*
for a list of potential commands. Like so:
CommandType     Name                                               Version    Source
Cmdlet          Get-LocalGroup                                     1.0.0.0    Microsoft.PowerShell.LocalAccounts
Cmdlet          Get-LocalGroupMember                               1.0.0.0    Microsoft.PowerShell.LocalAccounts
Cmdlet          Get-LocalUser                                      1.0.0.0    Microsoft.PowerShell.LocalAccounts
Cmdlet          Get-Location                                       3.1.0.0    Microsoft.PowerShell.Management
Alternatively, if you want to stop something, you can try looking it up by the noun, for example by typing
Get-Command -noun *stop*

CommandType     Name                                               Version    Source
-----------     ----                                               -------    ------
Function        Get-StartApps                                      1.0.0.0    StartLayout
Cmdlet          Export-StartLayout                                 1.0.0.0    StartLayout
Cmdlet          Export-StartLayoutEdgeAssets                       1.0.0.0    StartLayout
Cmdlet          Get-AzureRmDtlAutoStartPolicy                      4.2.0      AzureRM
Cmdlet          Get-AzureRmDtlAutoStartPolicy                      3.2.0      AzureRM.DevTestLabs
Cmdlet          Import-StartLayout                                 1.0.0.0    StartLayout
Cmdlet          Set-AzureRmDtlAutoStartPolicy                      4.2.0      AzureRM
You may also want to bookmark https://blogs.technet.microsoft.com/heyscriptingguy/2015/06/11/table-of-basic-powershell-commands/ which provides a list of all the basic PowerShell commands.
Running PowerShell Scripts
PowerShell commands can be grouped together and packaged in to scripts, usually with a .ps1 extension, and run from the command line.
For example, open Notepad and copy in the following simple script, and save it to the location shown in your PowerShell command prompt (PS C:\Users\Yournameprobably):
#A Comment!
Get-ChildItem
Write-Output "Output the mode of a file"
(Get-ItemProperty ".\test.ps1").Mode
Then at the PowerShell command prompt, from within the folder where the file has been saved, type
.\test.ps1
to run the script. Spoiler - this probably won’t work yet.
PowerShell Execution Policies
If you try to run a script in PowerShell and get a message saying something along the lines of “Execution of scripts is disabled...” don’t panic. Your Windows machine is set-up by default to be secure and prevent scripts from running without your permission. Before you it can run scripts, you need to give it permission.
The quick solution to this problem is to type
Set-ExecutionPolicy RemoteSigned
in to the command prompt and get on with your life.
NOTE: You may need to relaunch PowerShell with Administrator privileges to run this command. Launching PowerShell as an Admin is easy. Type PowerShell in to the run box, right click PowerShell from the menu, select run as Administrator.
The Execution-policy dictates what your machine is allowed and is not allowed to do. The options are Restricted(default), AllSigned, RemoteSigned, UnRestricted (insecure), Bypass (more insecure!).
RemoteSigned will allow local scripts to run on your machine, and Remote scripts to run provided they are from a trusted provider with a valid security certificate. You can find out more at https://msdn.microsoft.com/powershell/reference/5.1/Microsoft.PowerShell.Core/about/aboutExecutionPolicies.
PowerShell Integrated Script Environment (ISE).
So far, we’ve covered installing, running and using PowerShell from the command line and through the use of scripts written using Notepad. That’s fine and good, but when you want to write and debug more serious, complicated scripts there’s a better option PowerShells Integrated Script Environment (ISE).
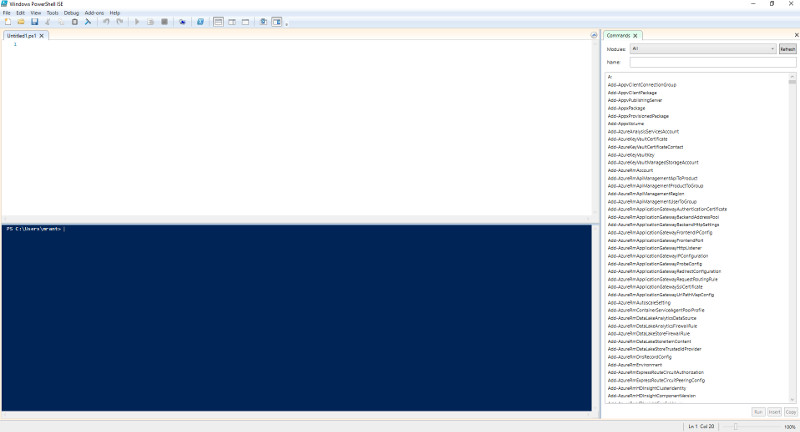
To start ISE simply type ISE in the run box and click enter. The default view should look like the image below with the script pane area (editor, notepad) at the top, a PowerShell Console (command line) area at the bottom, and a Command helper dialog on the right. You can change the view from the View menu if you can’t see these view-panes or wish to change the layout; alternatively use the buttons on the right-hand side of the toolbar to quickly toggle views on and off.
You can type commands directly in to the console at the bottom – try
Set-Location C:\
to change directory to the root C: drive – just like you would a standard PowerShell console, but with the added benefit of intellisense to guide you.
You may also add commands using the editor. Try another command, perhaps Get-Location this time, and click the Green arrow in the tool bar to run the command. You’ll see the output appear in the Console pane below, just as if the command had been issued in the Console itself.
The benefit of using the Script pane, like using an editor such as notepad, is that you can save the commands as a script and run them later as when you need them.
You can run entire scripts by pressing F5 or clicking the green arrow on the toolbar.; and whilst writing scripts you can run individual commands by selecting them and pressing F8 or clicking the document icon with a green arrow on it, next to the green arrow on the toolbar.
Integrated Script Environment (ISE) Debugging
Sooner or later you’ll one of your scripts won’t work how you expect. Fortunately, ISE provides some debugging help. First enter a script and save it or load a pre-existing script. You can try this simple test script, which will output the creation time of all the files in your system’s root directory:
$folder = “C:\”
Set-Location $folder
$files = Get-ChildItem
 foreach ($file in $files) {
   echo $file.Name;
   echo $file.C$files.reationTime;
 }
NOTE: I should explain here that $ is used to denote variables. For example, $files is a variable used to store the results from the Get-ChildItem command. These variables are .NET types. Typing $files.GetType() on the command line will provide the .NET type information.
As you know, to run an individual code snippet you can just highlight it and press F8 to run it. Then you can go to the command line and interrogate the system, say by type $files or $files.GetType() to find out what’s been returned by Get-ChildItem.
Alternatively, you can go to the line you’re interested in, say $item.CreationTime; , and press F9 to set a breakpoint. Then when you run the script (F5) it will stop at the break point and you can review the state of the system and script variables. Pressing F11 will continue to step through the program one line at a time. Allowing you to find errors and mistakes. Press shift-F5 to stop debugging
More debugging commands are available in the debug menu and if you right click on a line in the script pane.
We’re Done.
I know this will have been a bit of a roller-coaster ride if you haven’t used PowerShell before but if you've made it this far then you now know enough to get started.
We’ve covered what PowerShell is, how to install it, how to write scripts and how to debug them. We’ve also covered some common commands, where to find more commands and how to get help using them. Enjoy.
Want to Thank Me?
Did you like this article? Was it helpful? Why not buy me a coffee on Paypal? Buy me a coffee?